AWX Tower Teams Notification
Published:
Guide: Sending Notifications to Teams Webhook from AWX Tower
In this guide, you will learn how to send notifications to Microsoft Teams using a Webhook from AWX Tower, step by step.
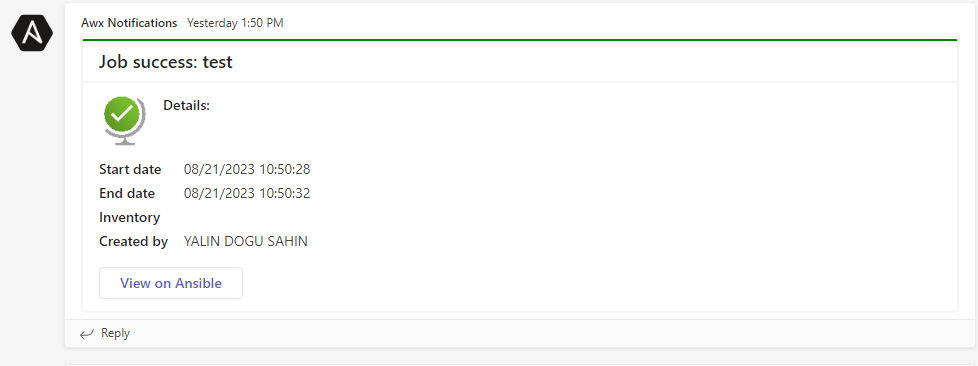
End result should be something like this:

Step 1: Creating a Teams Webhook
- Go to your Microsoft Teams channel.
- Click on the three dots in the upper right corner and navigate to “More options.”
- Go to the “Connectors” section and click on “Add” for “Incoming Webhook.”
- Provide a webhook name, and optionally add a profile picture. Copy the Webhook URL and save it somewhere.
Step 2: AWX Job Template Settings
- Go to the AWX interface and select or create the relevant “Job Template.”
- Navigate to the “Notifications” tab from the left menu.
- Click the “Add Notification” button and select “Webhook.”
- In the opened window, fill in the following details:
- Name: Name of the notification
- Webhook URL: The Teams Webhook URL you copied earlier
- HTTP Method: POST
HTTP Headers (Optional):
{ "content-type": "application/json" }- Start message body:
{ "@type": "MessageCard", "@context": "http://schema.org/extensions", "summary": "Job launched: {{ job.name }}", "title": "Job launched: {{ job.name }}", "themeColor": "FFFFFF", "sections": [ { "activityTitle": "Details:", "activityImage": "https://georgekosmidis.azureedge.net/azure-architecture-icons/general/10010-icon-service-Quickstart-Center-2048x2048.png", "facts": [ { "name": "Start date", "value": ("{{ job.started }}") }, { "name": "Inventory", "value": "{{ job.summary_fields.inventory.name }}" }, { "name": "Created by", "value": "{{ job.summary_fields.created_by.first_name }} {{ job.summary_fields.created_by.last_name }}" } ] } ], "potentialAction": [ { "@context": "http://schema.org", "@type": "ViewAction", "name": "View on Ansible", "target": [ "{{ url }}" ] } ] }- Success message body:
{ "@type": "MessageCard", "@context": "http://schema.org/extensions", "summary": "Job success: {{ job.name }}", "title": "Job success: {{ job.name }}", "themeColor": "008000", "sections": [ { "activityTitle": "Details:", "activityImage": "https://georgekosmidis.azureedge.net/azure-architecture-icons/general/10808-icon-service-Globe-Success-2048x2048.png", "facts": [ { "name": "Start date", "value": "{{ job.started }}" }, { "name": "End date", "value": "{{ job.finished }}" }, { "name": "Inventory", "value": "{{ job.summary_fields.inventory.name }}" }, { "name": "Created by", "value": "{{ job.summary_fields.created_by.first_name }} {{ job.summary_fields.created_by.last_name }}" } ] } ], "potentialAction": [ { "@context": "http://schema.org", "@type": "ViewAction", "name": "View on Ansible", "target": [ "{{ url }}" ] } ] }- Error Message Body:
{ "@type": "MessageCard", "@context": "http://schema.org/extensions", "summary": "Job error: {{ job.name }}", "title": "Job error: {{ job.name }}", "themeColor": "FF0000", "sections": [ { "activityTitle": "Details", "activityImage": "https://georgekosmidis.azureedge.net/azure-architecture-icons/general/10807-icon-service-Globe-Error-2048x2048.png", "facts": [ { "name": "Start date:", "value": "{{ job.started }}" }, { "name": "End date:", "value": "{{ job.finished }}" }, { "name": "Inventory:", "value": "{{ job.summary_fields.inventory.name }}" }, { "name": "Created by:", "value": "{{ job.summary_fields.created_by.first_name }} {{ job.summary_fields.created_by.last_name }}" } ] } ], "potentialAction": [ { "@context": "http://schema.org", "@type": "ViewAction", "name": "View on AWX Tower", "target": [ "{{ url }}" ] } ] }- Approve Message Body:
{ "@type": "MessageCard", "@context": "https://schema.org/extensions", "summary": "Workflow approval node got Approved: {{ approval_node_name }}", "title": "Workflow approval node got Approved: {{ approval_node_name }}", "themeColor": "008000", "potentialAction": [ { "@context": "http://schema.org", "@type": "ViewAction", "name": "View on Ansible", "target": [ "{{ workflow_url }}" ] } ] } - Click “Save” to save the notification settings.
Step 3: Running the Job and Receiving Notifications
- Run the Job Template.
- When the job starts or completes, AWX will automatically send a POST request to the Teams Webhook you specified.
- Go to your Microsoft Teams channel and see the notification sent by AWX.
By following this guide, you can send notifications to Microsoft Teams using a Webhook from AWX Tower. You can customize or enhance the steps according to your needs. Good luck!
